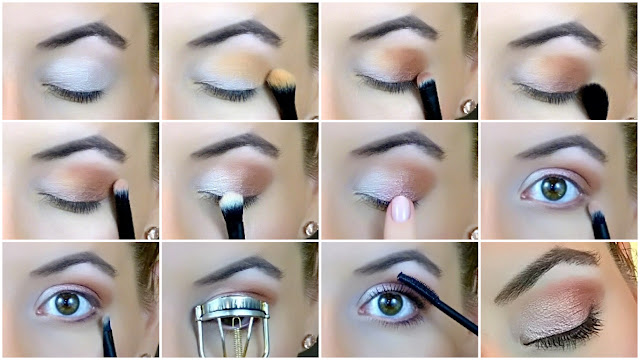
Violet Voss Essentials Palette Tutorial
When I got this Violet Voss Essentials eyeshadow palette in my September Boxycharm, I couldn’t wait to start playing! I’ve always heard great things about their eyeshadow formula, but have yet to try any of their products. When trying a new brand, eyeshadow palettes are one of my favorite things to test first because there’s so many factors that go into it. For this tutorial, I’m challenging myself to create an entire eyelook using just this one palette!
To start, I’m using the Maybelline Color Tattoo Eye Chrome in the shade Gilded Rose as my primer. This is one of my favorite primers because it really enhances the eyeshadow colors and makes them last a lot longer throughout the day.
To start, I’m using the Maybelline Color Tattoo Eye Chrome in the shade Gilded Rose as my primer. This is one of my favorite primers because it really enhances the eyeshadow colors and makes them last a lot longer throughout the day.
Once the primer has dried, I’m taking the shade Sand and blending that into my crease with the Moda Pro BMX-430 Crease brush that was also part of a set included in my September Boxycharm. These eyeshadows do kick up a little bit of powder when dipping the brush into them, so that’s something to keep in mind. Stay tuned for my full review of this palette, including all the quality details, coming next week!
Now I’m taking the darkest brown in the palette called Cinnamon and packing that on the outer third of my eyelid with the BMX-402 Smudger brush from that same Moda Pro set. The density of this brush is great for getting color onto the lid very precisely. Once that’s applied, I blended it out with a separate, empty, more loose-bristled blending brush to blur the edges.
To add a little more dimension in the crease, I’m taking the Dusty Rose shade on the BMX-420 Detail brush and using very light pressure to place that right at the edge of where the other colors stop. This will create the illusion that there’s more lid space, which will make the eyes appear bigger.
When I see a beautiful bright shimmer shade like Cream in a palette, I automatically want to put that on the inner half of my lid. I love the way bright shimmers catch the light and really make the eyes sparkle. I put this shade on the inner two-thirds of the eye that didn’t have any color and blended it in the crease with the BMX-466 Shade brush.
Because I’m working with a palette and the shades are readily available, I decided to dip into the eyeshadow appropriately called Pink and patted that right in the bottom center of my eyelid. This helps to tie the lid shades together and add even more dimension.
For one last little pop of color, I took the Plum Berry shade and blended that underneath my lower lashes using the BMX-420 Detail brush. This shade does have some shimmer to it, but it’s not really noticeable when applied in such a small area. If you wanted an even brighter color, go for the Emerald shade instead.
Finally, I’m taking the Black eyeshadow and using that as my eyeliner with the BMX-498 Line brush. This shade is incredibly pigmented, so start with a light hand and add more as needed. If you need the eyeliner to stay in place for a long day, add a black pencil underneath to act as a base.
Now all there’s left to do is finish everything up with a few coats of mascara. I’m using my favorite Benefit Roller Lash mascara because it adds the length and volume that I want without having to reach for anything else.
Here’s a close-up of the final look:
And a quick, more condensed guide recapping every step for easy reference:
To finish the rest of the face, I applied my favorite Makeup Geek blush in the shade Heart Throb. This is such a beautiful blush that matches with just about anything. I topped that with the Laura Geller Baked Highlighter in the shade Peach Glow and used a combination of the MAC lipstick in CB 96 and the C.O. Bigelow Mentha Supreme 2X gloss on the lips.
These eyeshadows were just as pleasant to work with as I expected them to be. They’re all extremely pigmented and blend effortlessly. Although I’m loving the color combination on the eyes, I think I’d prefer to switch out the lip color for a deep burgundy or berry. I wanted to use the MAC lipstick, along with the highlighter and brushes to make it a total Boxycharm challenge!
If you enjoyed this tutorial, please feel free to share it using one of the buttons below. If you recreate this look, or get inspired to create something similar, don’t forget to tag me on social media -- all of my links are at the bottom of the post. I’d love to see what you come up with!
Have you used this palette before? What monthly subscription box is your favorite?
XO ♥ Christina ♥
Don’t forget to follow me on all of my social media!


